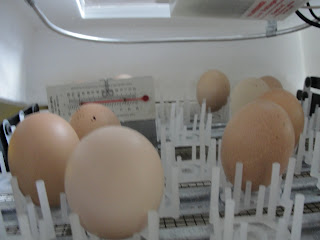
It's been a while since our last blog entry, but an exciting new chapter in the Furry household unfurls as I write! The countdown has begun. In roughly 14 days, we will hear the peeping of little chicks. (The gestation period for chicken eggs is 21 days.)
We have an incubator all set up and we now have eggs! We went to our local farmer's market last week to arrange a pick up of our dozen Delaware eggs at the rock bottom price of $2.50 from our friends Mike and Chris Chester at Always Somethin' Farm. They were kind enough to let us borrow a great little book called "A Guide to Better Hatching" by Janet Stromberg. It's out of print, but you may be able to locate a used copy online. I found another excellent site that was created by the University of Illinois Extension. It gives helpful information explaining the operation for a still air incubator (excellent for us, as we do not have instructions for the one we are borrowing from our aunt). Our incubator has an automatic egg turner too. Our aunt has used it many times in her classroom over the years as a first-grade teacher. We received a new thermometer before using it because they lose there accuracy over time, and temperature is an essential part of incubating correctly.
Our aunt gave us some great pointers so we could get the incubator setup correctly:
We also picked up a chick starter kit at Tractor Supply for about $20. It has a waterer and food feeder, a small bag of chicken feed starter, a box to put the chicks in for safe transport, a little cardboard corral for them to safely play outside (supervised) and some coupons for chicken-related products at the store. We also picked up a heat lamp and light bulb for it.
Our aunt gave us some great pointers so we could get the incubator setup correctly:
- A well (called the moisture channel) inside the bottom of the incubator holds water to keep the eggs moist.
- Each egg nestles into cradles, and the eggs need to be placed skinny point down. The airspace in the egg is at the largest and widest part of the egg.
- Two windows allow for checking the temperature, which we set as close to 99.5 degrees as possible. Temperatures vary according to the type of incubator you have, so do the research before using your particular incubator.
We also picked up a chick starter kit at Tractor Supply for about $20. It has a waterer and food feeder, a small bag of chicken feed starter, a box to put the chicks in for safe transport, a little cardboard corral for them to safely play outside (supervised) and some coupons for chicken-related products at the store. We also picked up a heat lamp and light bulb for it.
We are getting to the point were we can check the eggs and toss out the bad ones. I purchased an Ova Scope after reading Jennifer Sartell's awesome blog post reviewing the Brinsea Ova Scope. I scoured the Internet for a good deal on the scope. It's a large expense at $70 with shipping, but I think the girls will really enjoy being able to see their chickens growing inside the eggs and we will use it again. It will also be fun to share with our friends and family when the eggs are hatching too. We'll have a blog for you about that in the next week or two and a video of the chicks inside their eggs (we hope)!
We still have no coop, but we'll report on that, too, as we press forward. A couple of weeks ago, we received some great freebies for the coop from my godfather, which I'll post about soon. He also helped us with the coop design and supply list. We should be able to make our coop, which includes a fenced-in run, for about $100. Not too shabby. I'll be keeping track of the receipts as we buy our supplies to see how close we come to hitting the mark!


No comments:
Post a Comment